Having worked on rendering text on my AxiDraw, the next question is how to typeset text. The challenge is SVG 1.1 text elements are explicitly single line, no automatic wrapping. There’s no text flow in an SVG renderer, you have to do it yourself. (SVG 2.0 promises to add this, and I guess there was an ill fated effort in SVG 1.2).
There is a nice way to express multiline text in SVG using the <tspan> element.
    <text class="verse">
        <tspan dy="1.2em" x="10"
               >How doth the little crocodile</tspan>
        <tspan dy="1.2em" x="10" dx="1em"
               >Improve his shining tail,</tspan>
        <tspan dy="1.2em" x="10"
               >And pour the waters of the Nile</tspan>
        <tspan dy="1.2em" x="10" dx="1em"
               >On every golden scale!</tspan>
    </text>
Note the use of dy to do the line spacing; that’s nearly automatic. (the dx parts are for some fancy indentation. Not sure why x is being set explicitly every time.) All you have to do is decide where to break the lines! Ha.
I can’t find a Python library that will break lines for you or do more fancy automated typesetting. It is possible in Javascript, or at least you can write code to do it, using the getBBox() function to inspect the pixel size of some text and use that to break lines.
One approach in Python would be to calculate metrics for a font and then use that to estimate the width of a word. That won’t work if the kerning isn’t predictable. Also it’s a lot of work to do right for arbitrary fonts.
A second approach is to use something to render SVG in Python and use that to measure widths. Something like the pyrsvg wrapper for librsvg. That’s a lot of code to bring in though and I’m not confident it would perform very well. py3rsvg looks promising as a lighter / standalone option. See also this discussion.
A third option is to skip SVG text entirely and work directly with HersheyFonts generated paths in Python. The library has support for inspecting the width of glyphs; bounding box, etc. But this library is a separate work from the Evil Mad Scientist / AxiDraw code for Hershey text, the one that’s an Inkscape extension. They’ve done some nice work on fonts, etc so I’m not sure how much you’re giving up going with this other code instead. SVG Fonts, for one; I think the HersheyFonts library is using the actual Hershey format. That means no Unicode. I’m not sure the ESM HersheyText Inkscape code can be repurposed though, it seems to be written in a very Inkscape-specific way and relying on their renderer. I could be wrong about that though.
I think that last option may be best; it’s closer to the actual SVG I want to send to the plotter.
On the back of my text experiments I decided to give italic calligraphy a try. Unlike other calligraphy which requires managing pen pressure, italic calligraphy is done with a simple stub nib (or italic nib) of fixed width. The drawing end is a short line, not a circle. It’s usually held at a 45 degree angle so that both vertical and horizontal lines are wide but a 45 degree line is very thin. It looks beautiful when you draw curves.
Italic calligraphy is a whole art, one of which I am mostly ignorant. But this website has a good introduction to the basics and there’s lots more resources on line. For a pen I am using the Sakura Pigma Calligrapher; their Pigma Microns are my favorite ordinary pens (needle point).
Italic pen nibs need to be held at a specific 45 degree angle to work well, this adapter from AxiDraw makes it possible. Easy to install, although note it’s not compatible with their other pen-holding addon, the one that lets you adjust angles. It took me awhile to understand why they mounted it in the direction shown in the photos. That keeps the pen tip out from under the robot arm, a good thing. However it means you need to place the AxiDraw on the right edge of the page; if you’re used to the AxiDraw being above your design (“on top”) then you need to rotate your images 90 degrees. (This orientation is natural for the AxiDraw; it’s designed for A4 pages in landscape orientation, wider than tall.)
The hardest thing is getting the rotation of the pen correct. You want it positioned so the entire flat line of the nib is in full contact with the page. That’s very fiddly. What I found worked best for me was to set the pen drop height fairly high, like 50%, and position the pen manually and screw it down tight. Then go back and adjust the pen drop to lower, say 40%. That way it won’t ever drop the pen just barely above the paper, particularly if the paper is not entirely flat.
The other thing I learned on my first experience is it works better drawing very slowly, like at 10%. I don’t know if that’s a limitation of the pen I’m using or just a reality. I also suspect it would work better with more pressure, ie a weight attached to the pen itself.
Anyway, after about 15 minutes off fiddling I got some plausible looking things. Here’s a test pattern, also some simple test text. The text is a 10mm high font (with a 2mm wide nib) converted to a stroke font via Hershey Text, using the EMS Readability font. Those simple stroke fonts are a virtue if you’re getting interesting design thanks to the pen nib! The test circles show some ink flow problems I still need to work on. Also I think the font size is a bit too small for the nib.
Update
Made some nice progress.
I figured out how to align the pen more easily. Gently! Let the pen just drop to the page and find its own level. Then don’t overtighten the grip on it, since that will move the pen. It’s still really fiddly though! I also got some mileage from a simple pen-aligment test print.
The 2mm Pigma Calligrapher definitely needs to write slowly. Even 20% speed is too fast; 10% seems OK but very occasionally skips ink. I wonder if that’s a deliberate decision, calligraphy artists tend to draw slowly. Or maybe it’s a requirement of the very wide ink aperture. Anyway it’d be nice if it were faster!
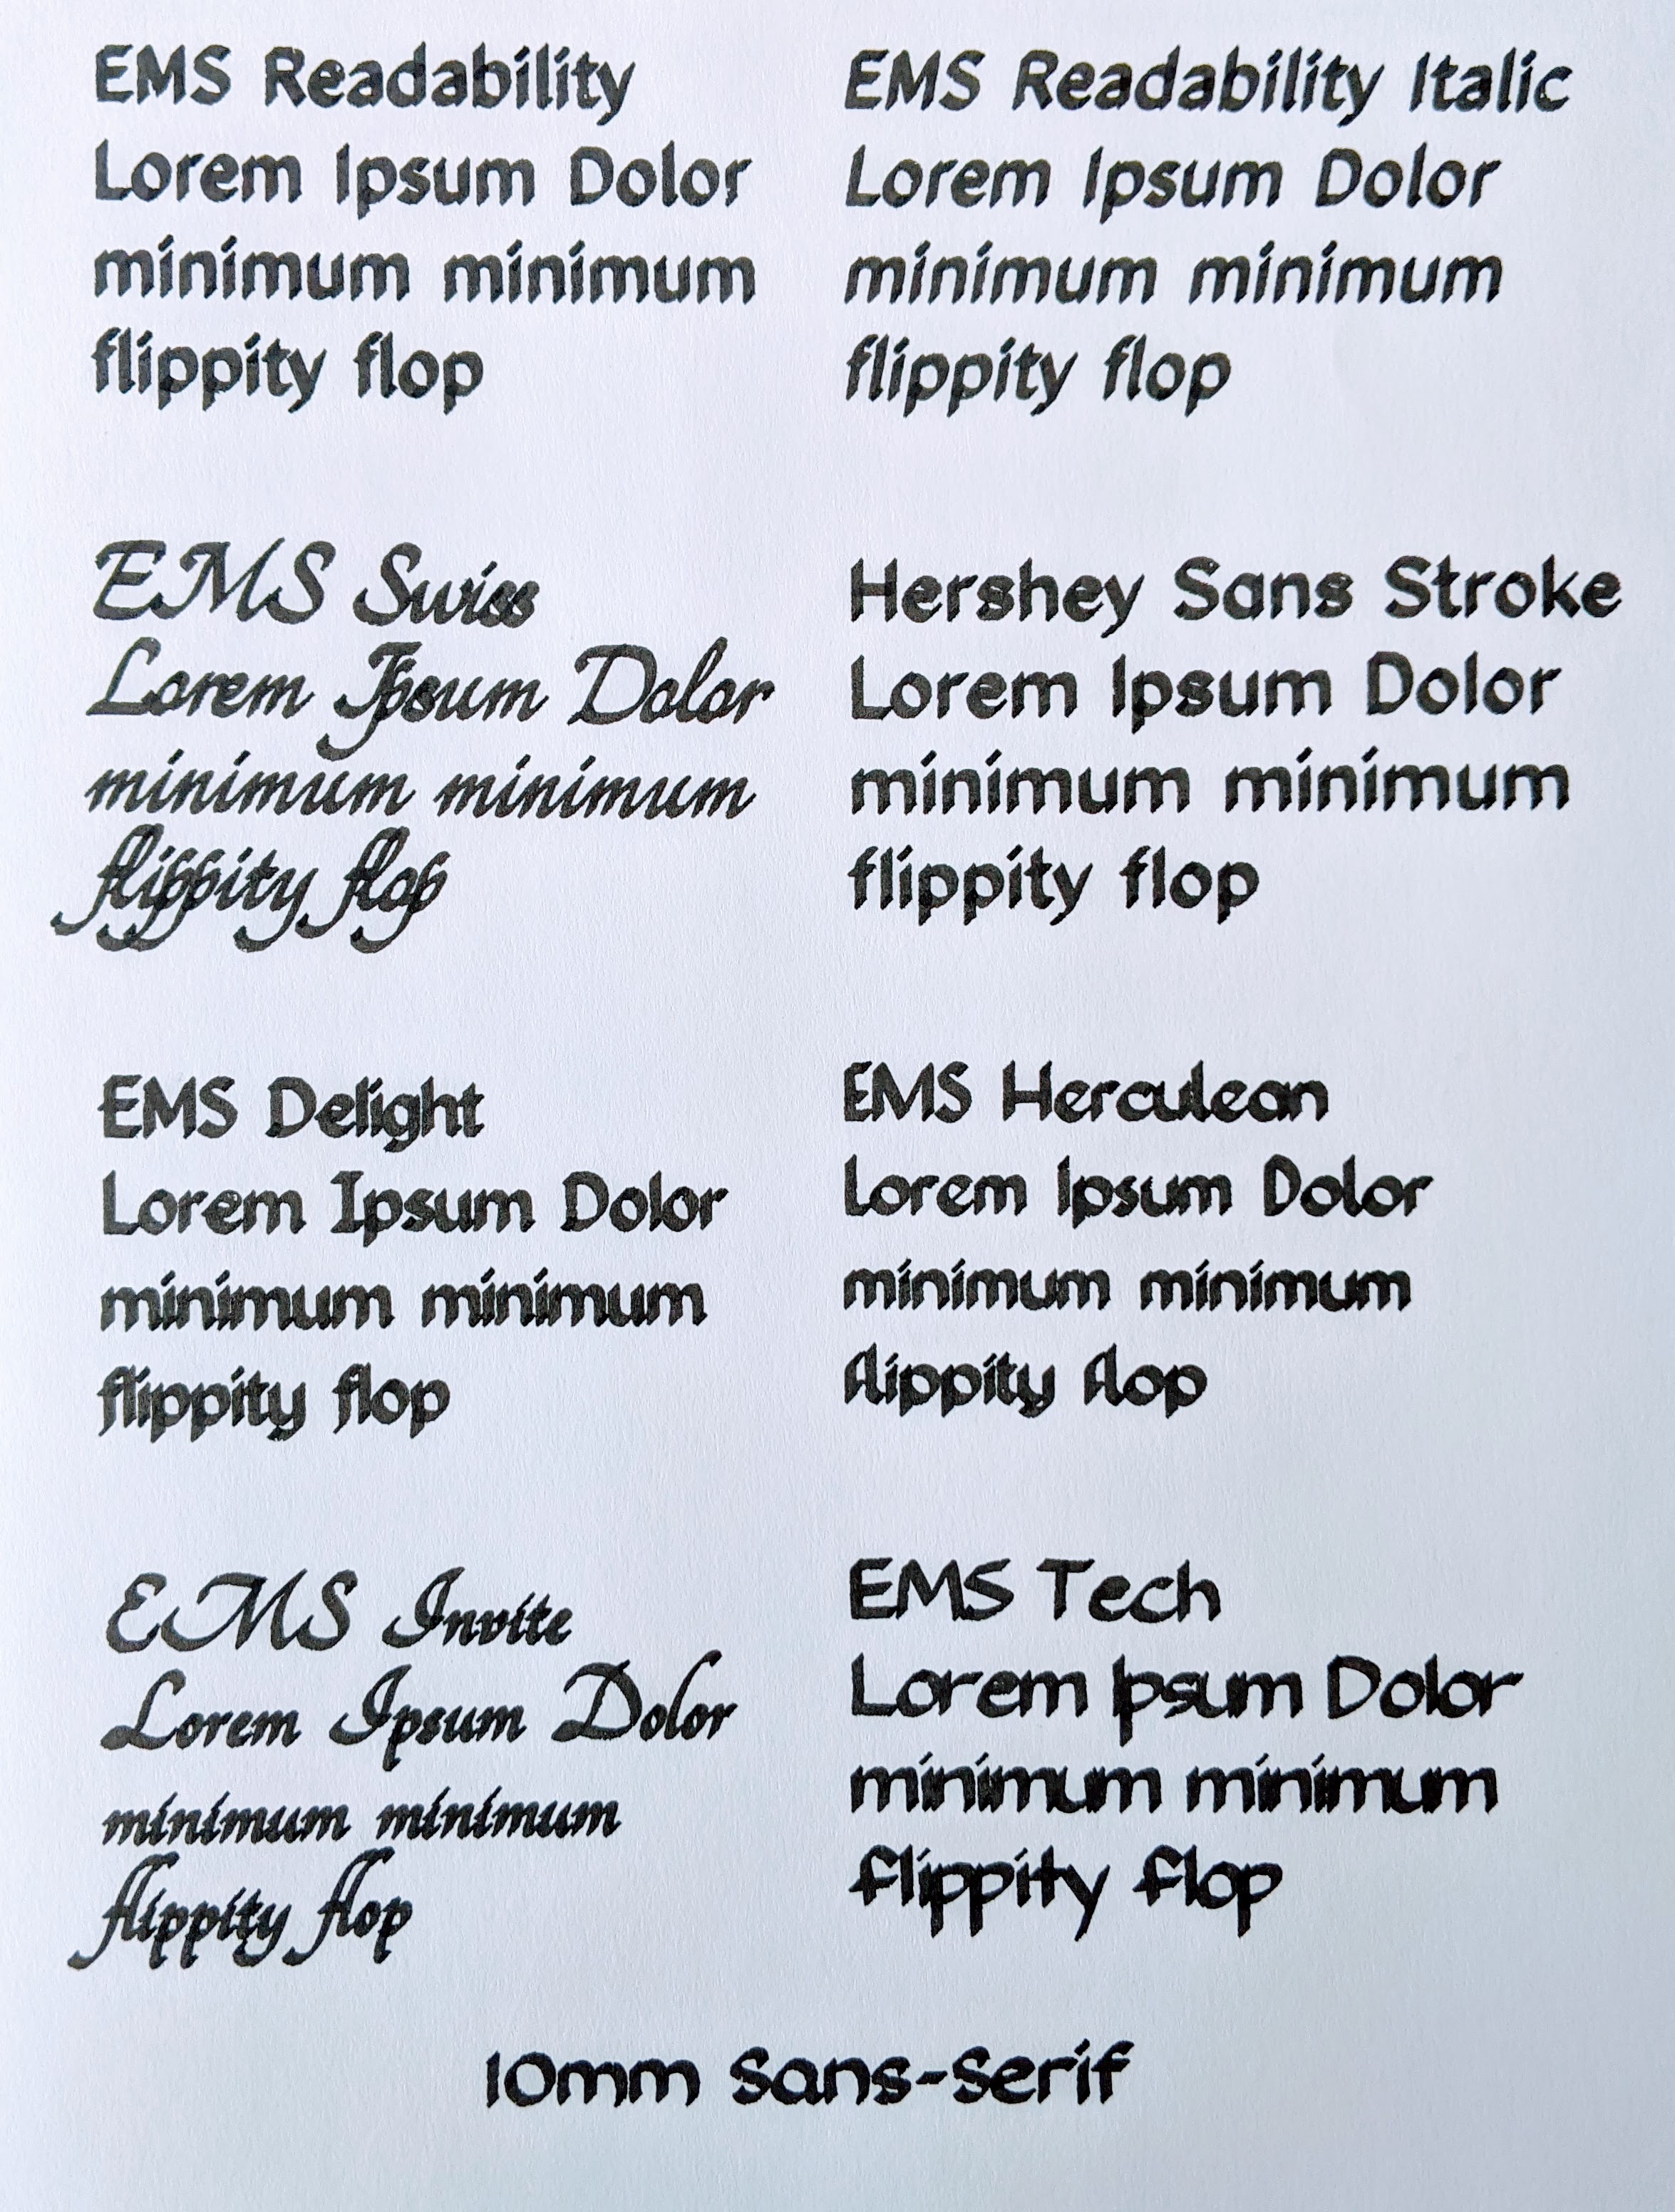
Below, on the left, I made a nice font sample using 10mm sans-serif as my input to Hershey Text and a variety of fonts. All of these look decent, although not are all equally readable. The italic / slanted fonts look better (duh! italic calligraphy is usually written with a slant). The hand script fonts with curves look nicer too. 10mm with a 2mm nib is still too small. On the right is the same image shrunk down 75% (so, 7.5mm?) with a 1mm nib. Looks way, way better.
Anyway this all looks pretty plausible as a basis for fancy looking robot handwriting. I think my next interest is getting some nicer stroke paths for the pen to follow, something more like a real calligrapher would do. I feel this stuff is very well codified by instruction. I should try programming that myself from videos! Or look into digitizing an actual expert’s motions.
In the sample images above, the font for “10mm sans-serif” is EMS Pancake. I included that as a joke but actually it looks pretty good.
I’m looking for some tools / inspiration for creating text with my pen plotter. The issue here is that most of desktop typography doesn’t apply to plotters because it all relies on filled fonts, effectively bitmaps. Pen plotters draw single lines. You can try drawing and filling the outline of a traditional TrueType font but that seldom looks good. OTOH there’s a whole art form of handwriting text with pens, so maybe some ideas from artists that can be borrowed?
Unfortunately traditional calligraphy is out because most calligraphy requires varying pen pressure to change line width and that’s something an AxiDraw and most other plotters simply can’t do. You can get somewhere using an italic nib (basically a pen tip that’s a wide line, not a point) but it’s pretty tricky. And it still relies on you having a font to draw the shapes.
The other quick solution is what’s called “Hershey Fonts” (after a Dr. Hershey!). AxiDraw has support for them as does this third party product but the actual classic Hershey fonts are, let’s just say, unaesthetic. The image below was plotted poorly with a bleeding pen on cheap paper, so ignore the dots and bleed, but nothing’s gonna fix these tragic shapes.
Update: when writing this up I neglected to talk about the EMS fonts, a series of free SVG fonts included for use with the HersheyText 3.0 plugin and SVG font format
The Good Stuff
So I asked on the drawingbots Discord for inspiration and got a couple of good suggestions.
A simple option is to just use better fonts. Single Line Fonts sells a handful of nice looking fonts for very modest prices, $20 or less. (And try the coupon TAKE25OFF). A bit heavy towards cursive scripts (but not true cursive, since the letters don’t actually connect.) There’s a very limited set of SVG fonts but a larger number of TTF fonts. I think those can be used with an AxiDraw OK, they mention that each line is drawn twice because of technical requirements.
A more sophisticated (and expensive) option is Quantum Enterprise’s single line fonts. There’s 59 fonts in a variety of styles. At $130 a font these aren’t cheap! But they’re nicely designed and have a lot of technical details on how to best use them with AxiDraw. Also these aren’t simple fonts; they have variant characters so that you can draw text without every single instance of a letter looking identical. They have a software tool (“Scriptalizer”) that will render variable text for you, demo it here. They also offer a service that will generate a custom font from a handwriting sample for $350.
Inspirations
One interesting point someone made is that a lot of what’s driving handwriting with plotters is marketing. Folks trying to mass-print mailers that look like they were hand written so you don’t just throw their junk mail immediately in the trash. I wonder if that’s part of AxiDraw’s business; you’d want a faster machine for mailing thousands of pages but it’s suitable for small runs of envelopes, etc. Anyway, sleaziness aside I’m glad to lift any approached they’ve developed. One interesting merchant in this area is Handwrytten, they sell robot-hand-written cards as a service ($3.25 a card!).
But what I really want to see is experimental / artistic plotter typography. Something like the explosion of interesting art folks were doing in the early 90s as desktop publishing technology made it so easy for artists to manipulate text. Stuff like this or this, only plotter-focussed. Someone must be doing this kind of work out there but I haven’t found it yet.
I’m also wondering what the state of the art is for true cursive script being generated in software. Something similar is essential for Arabic typesetting and is more-or-less a solved problem, so it seems likely that English cursive script could be doable?
Updates
There’s some good resources on the EMS Wiki also here. And some other stuff.
I tried taking a TTF font from vLetter (Hobbs), converting it to SVG font format with Convertio, and then using it with Axidraw Hershey Text (in Inkscape). Unsurprisingly this generates an outline font, not a stroke/engraving font, so each character is overdrawn twice (slightly off shifted). Probably no point converting the TTF to an SVG Font; the text to path tool in Inkscape can do the same thing. Anyway, my sample of 10pt text looked OK with a very tiny 0.05mm Staedtler pigment liner but it’s obviously not as good as a real stroke font. (Note the tiny hollow letters; that’s a fine nib on that pen, anything normal width would work better.) It’s not a bad option though if you want a quick handwriting look; vLetter has a lot of free handwriting fonts.
Playing with this made me wonder how hard converting a TTF outline font to a stroke font for SVG would really be. Taking the centerline of the font would be one possibility, although you would have to identify that with some heuristics (maybe following the TTF outline?) Also generating a path that’s inset a bit from the outside of the bitmap would work more nicely than centering the path on the edge; that would account for the width of the pen ink. For research, a program called SFEdit can do it but it looks like all it does is do centerlines for paths (not fonts).
BTW I’m a total novice at Inkscape, but the way it handles flowed text is confusing to me. I had reasonable luck flowing text to a circle and then converting it with Axidraw’s Hershey Font extension. First I had to do Text / Convert to Text to change the type from “text flow-in-shape”. Also it only worked if the text was left justified. Center justified ended up being positioned entirely wrong.
Mike Migurski reminds me his Skeletron project solved a similar centerline problem, for maps. Code is here. He says he designed it using ideas from this paper. Hand-waving a lot, the technique is to calculate Thiessen polygons (related to Voronoi diagrams) for the roads, then calculate the center of the edges of those polygons. The flowline for the center of the road goes through those polygon centers.
Some links on automating centerline creation in Inkscape:
One thing I like about pen plotting is how crunchy the materials are. I’m used to doing generative art and graphic design on screen where all the lines are pixel-perfect and if anything you try to hide the pixels, too. Ink and paper are much messier. Paper has texture and fiber. Ink bleeds and flows unevenly. There’s different kinds of pen inks, pigments that sit on top of the paper vs dyes that soak into it.
But despite liking all that crunchiness I also want control. I am particularly frustrated with the dot you get when the pen is dropped on to a page as the ink blots into the paper. Different materials have different amounts of bleed, consistency, etc. Sometimes you want something that works pretty much like pixels on a screen.
For paper I like this Neenah Exact Vellum Bristol, 8.5″ x 11″, 67 lb/147 gsm. It’s good heavy card stock. Paper is nicely flat but has just a bit of texture so that a swift moving pen leaves a slight graininess. (It’s not polished paper). It’s pretty cheap too, about $0.04 a sheet, so I’m using this for sketches that I expect to throw away.
The other paper I’ve used is this generic 5×7 note card 80lb / 216 gsm. The paper is a bit more polished than the vellum. I haven’t looked at cards too closely, mostly I just liked it came with matching envelopes and in small quantities.
Pens are a much bigger fun topic. I’ve tried lots but my go-to for basic solid line work is the Sakura Pigma Micron 05. My favorite thing is the very clean line it makes. Seriously looks like magic coming out of the pen, a solid smooth line. Almost no pooling / dots at the start or end of a line. I’ve never seen it smear or soak through heavy paper. The pens work great in a vertical orientation and ink flows cleanly at 50% speed on an AxiDraw; 75% starts being a little too fast. They come in a reasonable variety of colors, 15 in all, although the palette is a little heavy on the dark colors. The ink is advertised as archival quality. The 0.45mm pen (size 05) has the most color options and the line genuinely seems about 0.45mm thick. Parallel lines spaced 0.4mm show just a bit of white paper through, 0.3mm parallel lines make for a nearly solid color.
(I should disclose I’m a noobie to the pen plotter world, only been playing around with it on the side for a few months. There’s lots more to learn about materials!)
Finally made some purpose-driven art with the AxiDraw; a design for use on custom greeting cards. Materials are some Pentel felt tip pens on simple 80lb cardstock. Nothing fancy but I like the result.
Unfortunately the effect doesn’t photograph well. What’s here are a bunch of nested squares drawn in alternating colors. On the left is medium blue over pale purple, on the right is medium blue over a light orange. The effect is a weird op/art blending though, it looks like a complicated mottled texture rather than a bunch of distinct lines.
There’s one clever trick here.. the underlying color is drawn with straight lines, but the overlay color was drawn with some noise thanks to vpype’s squiggle filter. That gives the whole thing a less machine-drawn feel and lets a bit more of the undercolor seep out. I still wanted to have the feel of a page filled with color though, so there’s little to no white paper showing through.
I love some of the artifacts here. Particularly on the border, where there’s a software crop. The little dots of ink as the pen rests are great. I’m less excited about the dots in the middle. I used reloop to randomize their positions some but that only really works great on the squiggle layer (on the straight layer there’s only 4 possible start spots for each loop). I should try this with higher quality pens that don’t bleed ink at all, it’d look cleaner. Maybe the squiggle noise is all I need for crunchiness.
Here’s a closeup of a rasterization of the lines showing the squiggle trick. You want to zoom this image to 100% for it to make sense.
Wanted to give a shout-out for a great tool for working with SVG files and plotters: vpype. It’s a multifunctional tool for taking an SVG file you’re about ready to plot and then making it “better” for the plotter. Here’s an example of how I use it:
That’s a pipeline that does the following (in order)
Read my input SVG
Crop the SVG to the given rectangle.
Merge lines if points are within 0.05mm of each other. This “cleans up” the SVG and makes for faster plots with fewer, more complex paths.
Re-order loop lines so that each loop starts at a random point. This breaks up artifacts from the pen at rest blotting ink into the paper.
Sort the lines to minimize pen up travel distance. Axidraw does this too but supposedly vpype works better.
Write out the output SVG
It’s a pretty powerful tool and what it can do is confusing at first. But the docs are good. The feature overview is the best list of commands it understands grouped by theme. Beyond that check out the cookbook and the CLI reference. There’s also a handful of plugins; the one that caught my attention is occult which will emulate the masking you get if you put a filled polygon on top of other stuff in an SVG file.
vpype works by default as a command line tool. It also has a Python API and the ability to write your own plugins in Python.
Under the hood what vpype is doing is interpreting the SVG to build up geometries in memory. It’s sort of like rasterizing things on a grid, although not quite. It then uses that model to allow it to combine lines, simplify geometry, etc. Along the way it squashes all curves into collections of little short lines. (The plotter would do this anyway, so no great loss).
Bonus image: it has a fun “squiggles” filter which makes the lines not straight.
I bought myself an AxiDraw pen plotter. Inspired by the work of my friends Joshua Schachter and Michal Migurski, not to mention the wide world of #PlotterTwitter, I figured I’d take a turn at doing some pen art. It’s been a long time since I programmed any original generative art of my own and I’ve never really worked with pens and paper, so it seemed fun. Here’s my first work.
Yes, its dicks. A lot of people’s first plotter piece is small multiples of things with slight variance. But why draw lots of circles when you can draw lots of dicks? I confess I still have the sense of humor of a 12 year old. Also I like dicks. I had in mind Keith Haring or something when planning this although I’ve quickly found owning a fancy plotter and knowing some Python does not make you Keith Haring. His dicks are so charming!
Learned a lot doing this. Most of it is about the fussiness of pen on paper. Pens all have different rates of ink flow and papers have different absorbancy. I was doing my first tests with sharpie on cheap printer paper which bleeds all over the damn place; the moment the pen dwells for even half a second you get a big blob. This is a somewhat inexpensive Lamy Safari Fountain Pen, a classic beginner fountain pen. Writes like a dream; I may switch to it for ordinary writing too! Good for thin precise lines. I also bought a whole bunch of other kinds of markers and pens including some meant to simulate watercolors.
The AxiDraw is a neat device too. It’s basically a metal framework with two very high precision servos (2800 dpi!) to move the pen to any X, Y coordinates. Also a simple pen-up/down device to lift the pen off the paper or let it rest on its own weight. That’s it; no pen pressure, no paper movement. Just pen up/down and move to x, y. It comes with an Inkscape plugin that can draw any SVG file you give it, and from that you can draw pretty much any vector graphics. The SVG interpreter has some limits; no masking. There is sort of hacked on support for text fonts and for fills, although really it’s about drawing lines.
This first piece I did in PyCairo, the classic drawing library. I don’t have much love for it. It’s very confusing about when you’re working in relative vs absolute coordinates and it has some vesitgal confusing path building thing that makes drawing arcs more confusing than it has to be. The big strength of PyCairo is you can draw in high level code and then render to SVG, PDF, various raster formats.. And it rasterizes beautifully. I don’t need all of that. My plan now is to re-write my dicks thing in a lower level SVG framework, maybe svgwrite. I want something like D3 for producing SVG drawings, just a little DOM manipulation help. An alternate approach is to do everything in Shapely, make an object scene graph. Shapely has SVG rendering support.
Beyond that I have a host of other arty projects in mind. Bringing in geographic data is an obvious thing; may be time to revisit my old watershed maps, rivers, even just a simple OSM map renderer could be fun. I’m hoping to get inspired by the messiness of the ink medium, I’ve seen some neat work from other artists that really leans into the aesthetic of slightly scratchy lines of slightly bleeding ink.